

Features
Pedestrian Mode Options
"default"
- A specific mode that calculates the fastest route using any combination of stairs + elevators
"elevators"
- Prefers elevators (falls back to stairs if needed)
"stairs"
- Prefers stairs (falls back to elevators if needed)
"wheelchair"
- Accessible only — no stairs, no fallback
Conditional Waypoints & Properties
- Conditional Waypoints — Dynamically inserted stops based on the route
- Properties — Metadata attached to locations within a route
Details
Overview
The Unit Map Navigation Service enables partners to deliver intelligent, step-based navigation experiences across their properties.
With recent enhancements, the platform now supports Conditional Waypoints and Properties.
Together, these capabilities allow a route to reflect real world navigation flows, making it especially useful for self-guided tours and guided access through a property.
What This Enables
These features allow partners to:
- Guide users through key access points (for example, gates, doors, and checkpoints)
- Provide contextual instructions at the right moment in a route
- Highlight relevant locations dynamically, without predefining every stop
- Create more intuitive, real-world navigation experiences
Key Concepts
Conditional Waypoints
Conditional waypoints are locations that are included in a route when relevant, based on proximity.
Instead of requiring every stop to be predefined, the routing service:
- Detects when a route passes near important locations
- Inserts those locations as intermediate stops
- Updates the route to reflect those additional steps
Example scenarios:
- A route automatically includes a gate when it lies along the path
- A tour path highlights an amenity only if it’s nearby
- A user is guided through required access points without manual configuration
Properties (Metadata for Routing)
The properties feature allows partners to attach custom information to locations within a route.
This can include:
- Access instructions (for example, entry codes and directions)
- Labels or identifiers (for example, unit number and door ID)
- Contextual details relevant to the user experience
This information is returned as part of the routing experience, enabling:
- Step-level guidance tied to real-world actions
- Flexible integration with partner systems
- Customization without changing routing behavior
How They Work Together
These two features are designed to complement each other:
- Conditional Waypoints determine where stops should be added
- Properties define what information is associated with those stops
How to Use It
- Designate conditional waypoints in a Directions request.
- Optionally attach metadata through the
propertiesfield. - The routing service includes the proximate, designated waypoints as stop and start points for trip legs within the route.
Current Limitations
- No directional awareness yet: the system does not differentiate between entering and exiting a location
- Geometry-based logic: waypoints are included based on proximity to a route, not semantic meaning
- Independent waypoint evaluation: relationships between locations (for example, inside vs. outside a building) are not yet modeled
Availability
These features are available in the Unit Map Beta SDK with pathfinding (v0.10.0-beta.3).
Route Exclusions
Define specific points or zones on a property map that the routing engine should avoid.
- Exclude waypoints — Routes avoid a specific point on a specific floor
- Exclude areas — Routes avoid an entire polygon zone
Details
Route exclusions let you define points or zones on a property map that the routing engine should avoid, such as:
- construction zone
- blocked sidewalk
- out-of-service elevator
- areas where the property wants to limit throughway foot traffic
Exclude Waypoints
Block routes from passing through individual points.
map.nav().directions(
  waypoints,
  {
    pedestrian: { mode: "default" },
    exclude: {
      waypoints: [
        {
          name: "Stairwell Door",
          point: [1122.52, 507.79],
          floor_id: "30952",
        },
        {
          name: "Out-of-Service Elevator",
          point: [1074.84, 536.87],
          floor_id: "30952",
        },
      ],
    },
  }
Each excluded waypoint includes:
-
point — [x, y] pixel coordinates on the map
-
floor_id — which floor the point is on
-
name — optional, for your own reference
Exclude Areas (Polygon Zones)
Block routes from passing through an entire zone. See our visual demo tool to help generate the polygon coordinates.
Generating Polygon Coordinates
You can draw exclusion areas using our tool at exclude-areas.demo.engrain.io
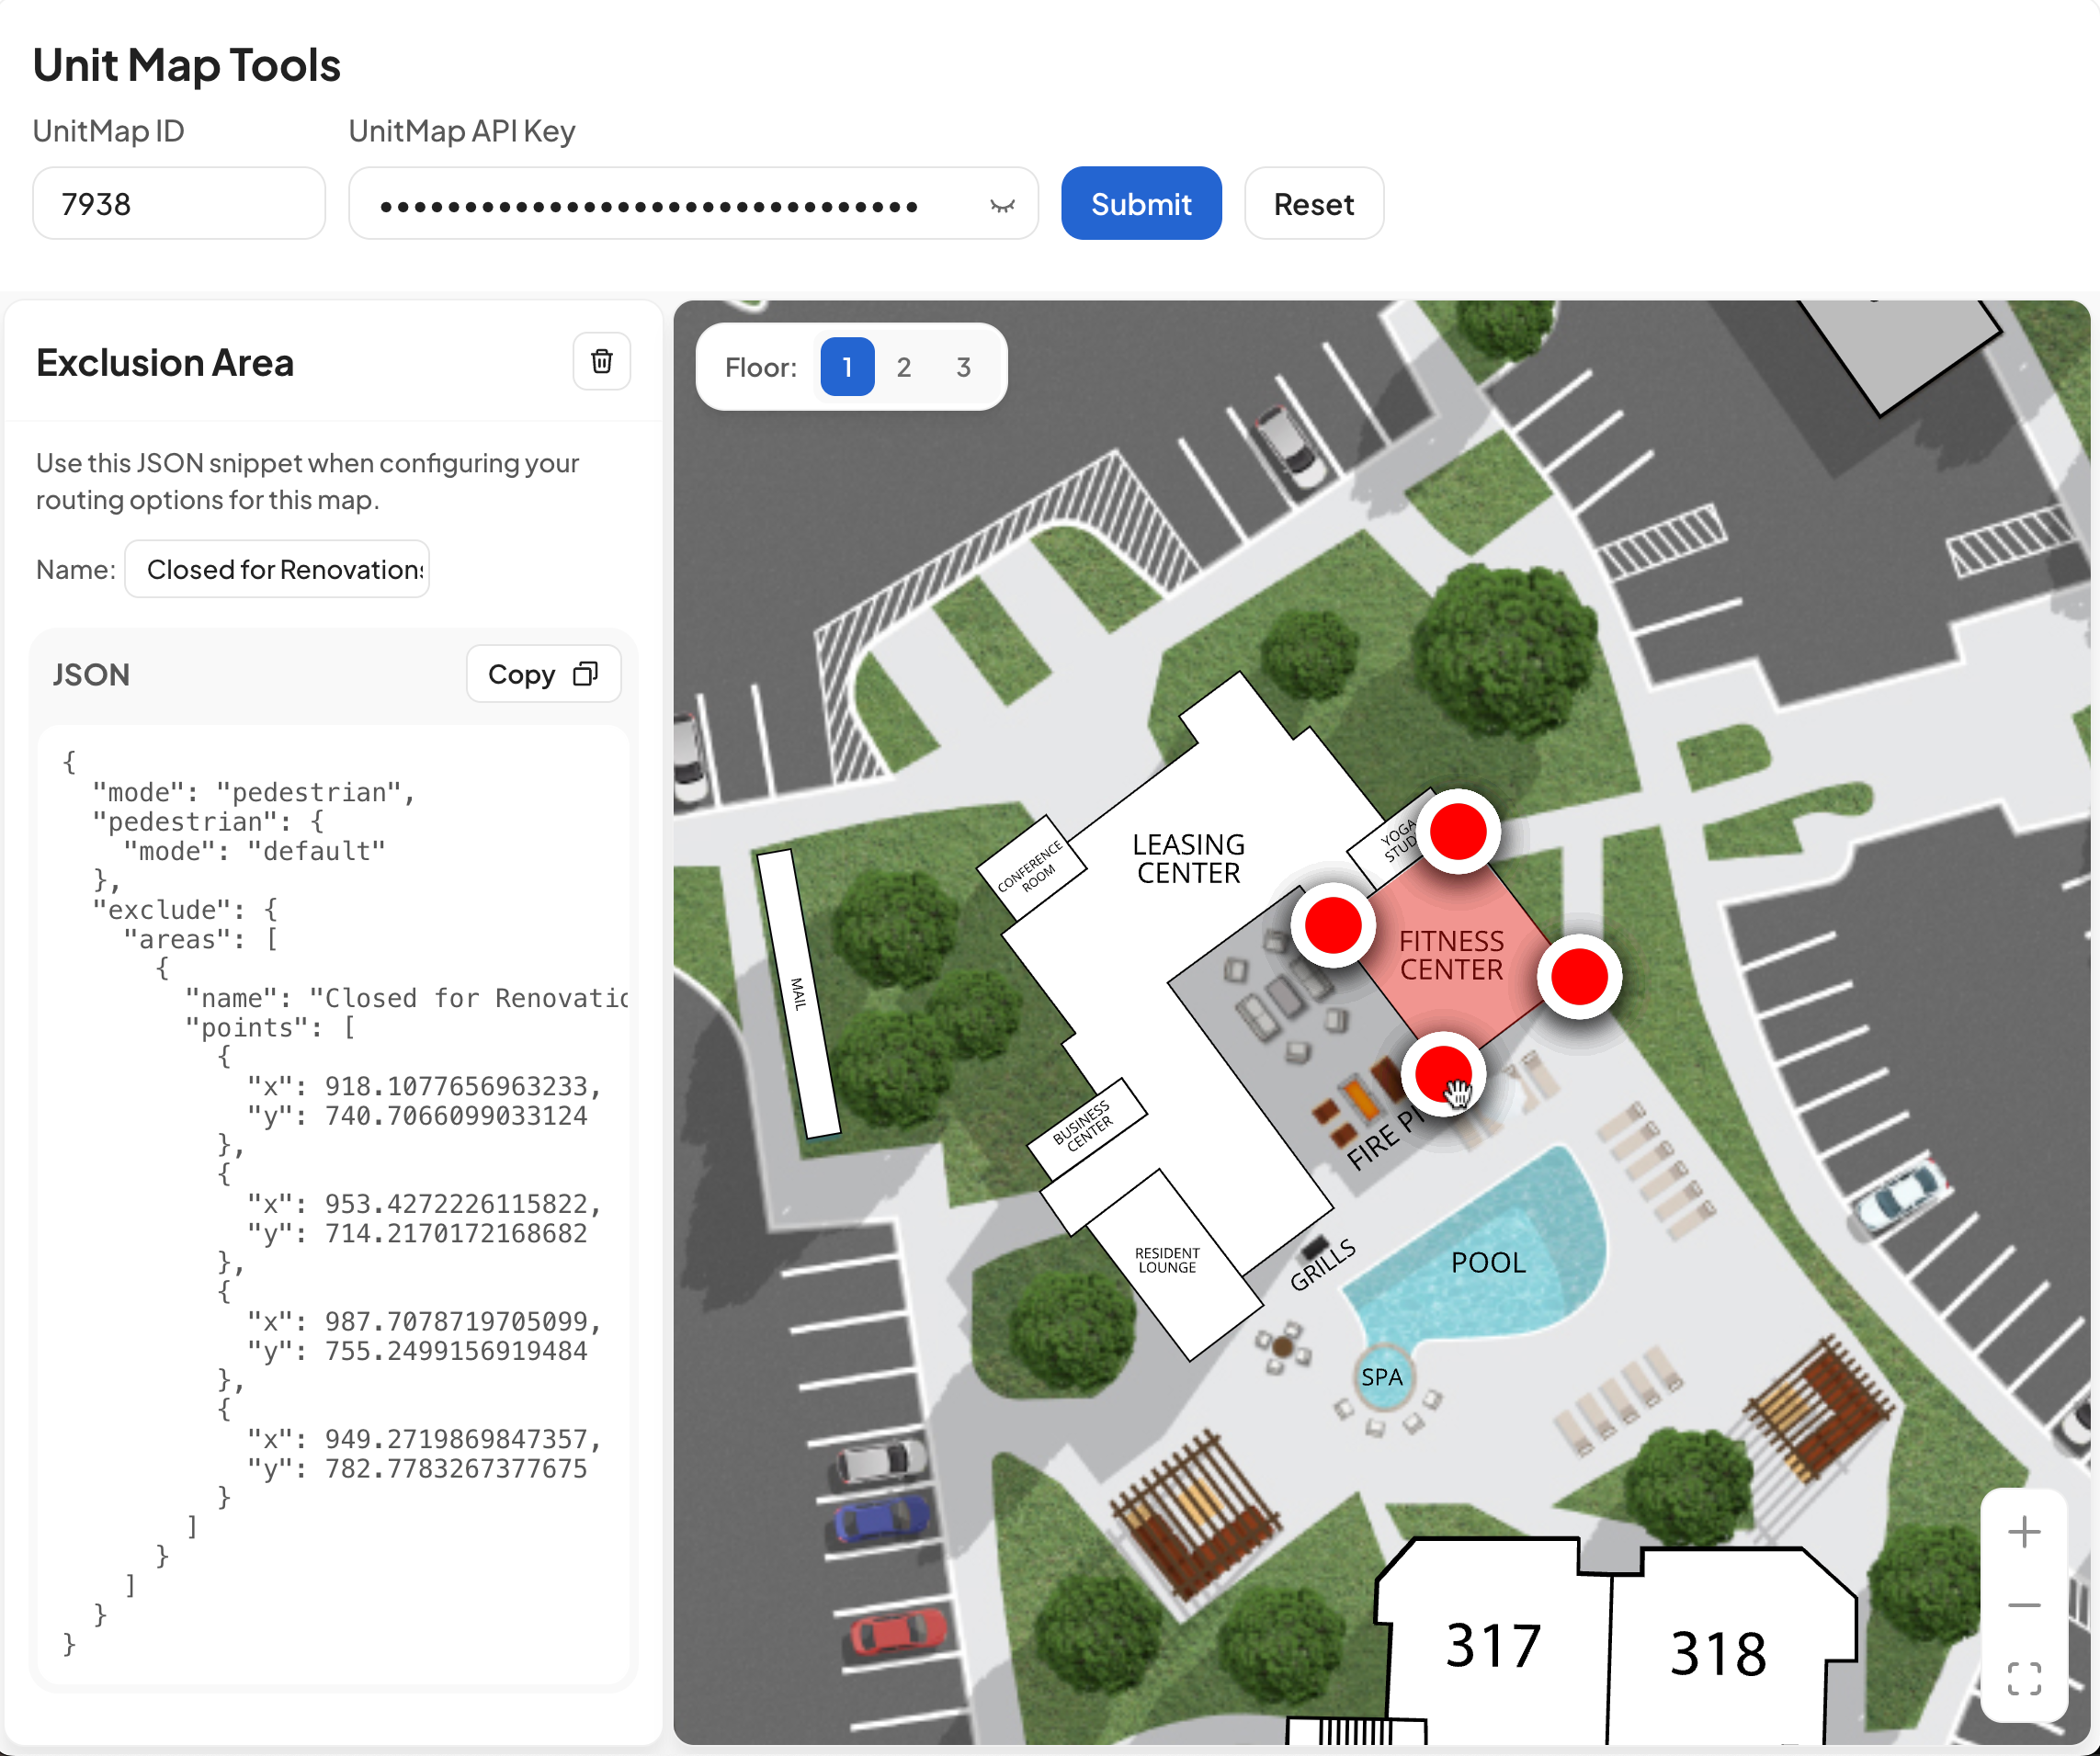
- Enter your UnitMap ID and API Key to load the property map
- Click on the map to draw and drag polygon vertices around the area you want to block
- Optionally give the area a Name (e.g., "Construction Zone", "Pool Deck")
- Copy the generated JSON snippet from the left panel
Using the Generated Config
const constructionZone = {
  name: "Construction Zone",
  points: [
    [1280.09, 442.02],
    [1277.81, 654.97],
    [1446.35, 658.38],
    [1441.79, 457.96],
  ],
};

map.nav().directions(
  waypoints,
  {
    pedestrian: { mode: "default" },
    exclude: {
      areas: [constructionZone],
    },
  },
Exclude areas are passed as part of the routing options in each Directions API call. They are not stored server-side — you include them with every route request.
The demo tool is an optional visual method to help generate polygon coordinates in the map space. Once you have the JSON, copy it into your system and include it with every route call.
Current Limitation: Floor-Specific Exclusions
Exclude waypoints can be floor-specific since they include a floor_id. However, exclude areas currently extrude vertically through all floors of a property. This means that if you exclude an area on floor 3, that exclusion also blocks routes on floors 1 and 2 beneath it. Floor-specific area exclusion** is in active development.
Maneuvers
Types
"becomes"
"building_enter"
"building_exit"
"continue"
"destination"
"destination_left"
"destination_right"
"elevator_enter"
"escalator_enter"
"exit_left"
"exit_right"
"ferry_enter"
"ferry_exit"
"left"
"merge"
"merge_left"
"merge_right"
"none"
"post_transit_connection_destination"
"ramp_left"
"ramp_right"
"ramp_straight"
"right"
"roundabout_enter"
"roundabout_exit"
"sharp_left"
"sharp_right"
"slight_left"
"slight_right"
"start"
"start_left"
"start_right"
"stay_left"
"stay_right"
"stay_straight"
"steps_enter"
"transit"
"transit_connection_destination"
"transit_connection_start"
"transit_connection_transfer"
"transit_remain_on"
"transit_transfer"
"uturn_left"
"uturn_right"
Turn-by-Turn Directions
The Unit Map Navigation Service provides algorithmically generated maneuver instructions intended as a foundation for navigation, while allowing applications to tailor how those instructions are presented to users.
Details
Replacing the Initial Instruction
Applications may choose not to display the default initial orientation instruction (e.g. "Walk east on the walkway"). Alternative implementations:
- Globally hide the first instruction
maneuver[0]entirely. - Replace it globally with generic text such as "Start" or "Follow the route line."
- Pair the simplified instruction with helper text, such as:
- "Enable your location to see where you are on the map."
- "Follow the highlighted route."
- Replace it with custom text attached to the waypoint via
propertiesas demonstrated in this example
These approaches often provide a simpler onboarding experience while still allowing the routing engine to generate the remainder of the turn-by-turn guidance.
Example
Applications can attach custom metadata to waypoints using the properties object. This example demonstrates adding start_instruction and end_instruction values to individual waypoints, allowing the application to replace the default first or last maneuver without modifying the generated route.
properties: {
  name: "Leasing Office",
  start_instruction: "Start from the leasing office.",
  end_instruction: "You have arrived at the leasing office."
}
A few simple conditionals determine when those custom instructions should be displayed:
const props = maneuver.properties();
let instruction = maneuver.instruction();

// Replace the first maneuver if a custom start instruction exists.
if (index === 0 && props?.start_instruction) {
  instruction = props.start_instruction;
}

// Replace the final maneuver if a custom end instruction exists.
if (maneuvers.length - index === 1 && props?.end_instruction) {
  instruction = props.end_instruction;
}
This approach gives applications complete control over the opening and closing instructions while continuing to use the routing engine for route generation.
Updated 3 months ago